Hi! I'm Shelly - mother of 5 and wife to the best man in the world. We love to play games and watch movies together. I have a passion for crafting in all it's forms - sewing, scrapbooking, bow making, painting, mod podge, you name it and I'll try it. Hope you enjoy our family adventures and crafts!
How I Became Shared Jelly
When my husband and I first got married we used to get messages on our answering machine for "Shared" and "Jelly" instead of Jared and Shelly. The first time we chuckled a little over it and by the fourth or fifth time, we decided the name should stick somewhere. And so, I've been sharing jelly all over the internet since. Enjoy!
Any mom of a little boy knows that he loves to take his toys with him everywhere he goes. . . action figures, hotwheels cars, nerf guns, etc. I made these fun bandoliers for my little boys to be able to tote their things around. You can also find them in my etsy shop.
So fun and so easy for them to throw over their shoulders and take their goodies around with them.
I don't know about you, but my little guys are in love with Nerf guns. I thought it would be cool to give them a place to carry all of their darts. I made them this Nerf Dart Bandolier. They love it. Can't use the guns without it anymore.
I saw this idea on etsy here. It is a Spot the Dot quiet book. You use the red dot through the book as it transforms to new things on each page. The original is done in just black and white, but I made mine in lots of colors. I didn't have the printed sentences on the bottom, but I added a few pages, too. My pages are made from some sample swatches of curtain fabrics that my husband got when he was working for a company who does curtains/blinds. You could easily do it on felt instead. Anyways, you get the idea. I made this for my baby girl for Christmas. Hopefully it will keep her busy at church.
This idea has been growing over the last month or so and here is what it has become.
I made these cute tin buckets for each of the kids. They are a fun little kit of goodies to take with them on long car trips, or vacations, or for waiting rooms, etc.
I started with these tin buckets that I found at Michaels and added their names in black vinyl.
On the inside of each lid I had some adhesive white board so they can doodle. Each one (except the baby) will have white board markers to color with.
Then I made some fun magnet games for each of them to play on outside of the lid (or anywhere on the tin for that matter).
Next I made some pouches for a pad of paper and crayons so they can write or draw.
I finished off each tin with a special new small toy. Overall cost of each tin came out to about $15 each. Now when we are headed out, I can tell the kids to grab their tins and put a couple of small toys inside to bring along and we'll be all set to be entertained. The only downside - metal tin buckets are not necessarily very quiet, but they do make really good drums!
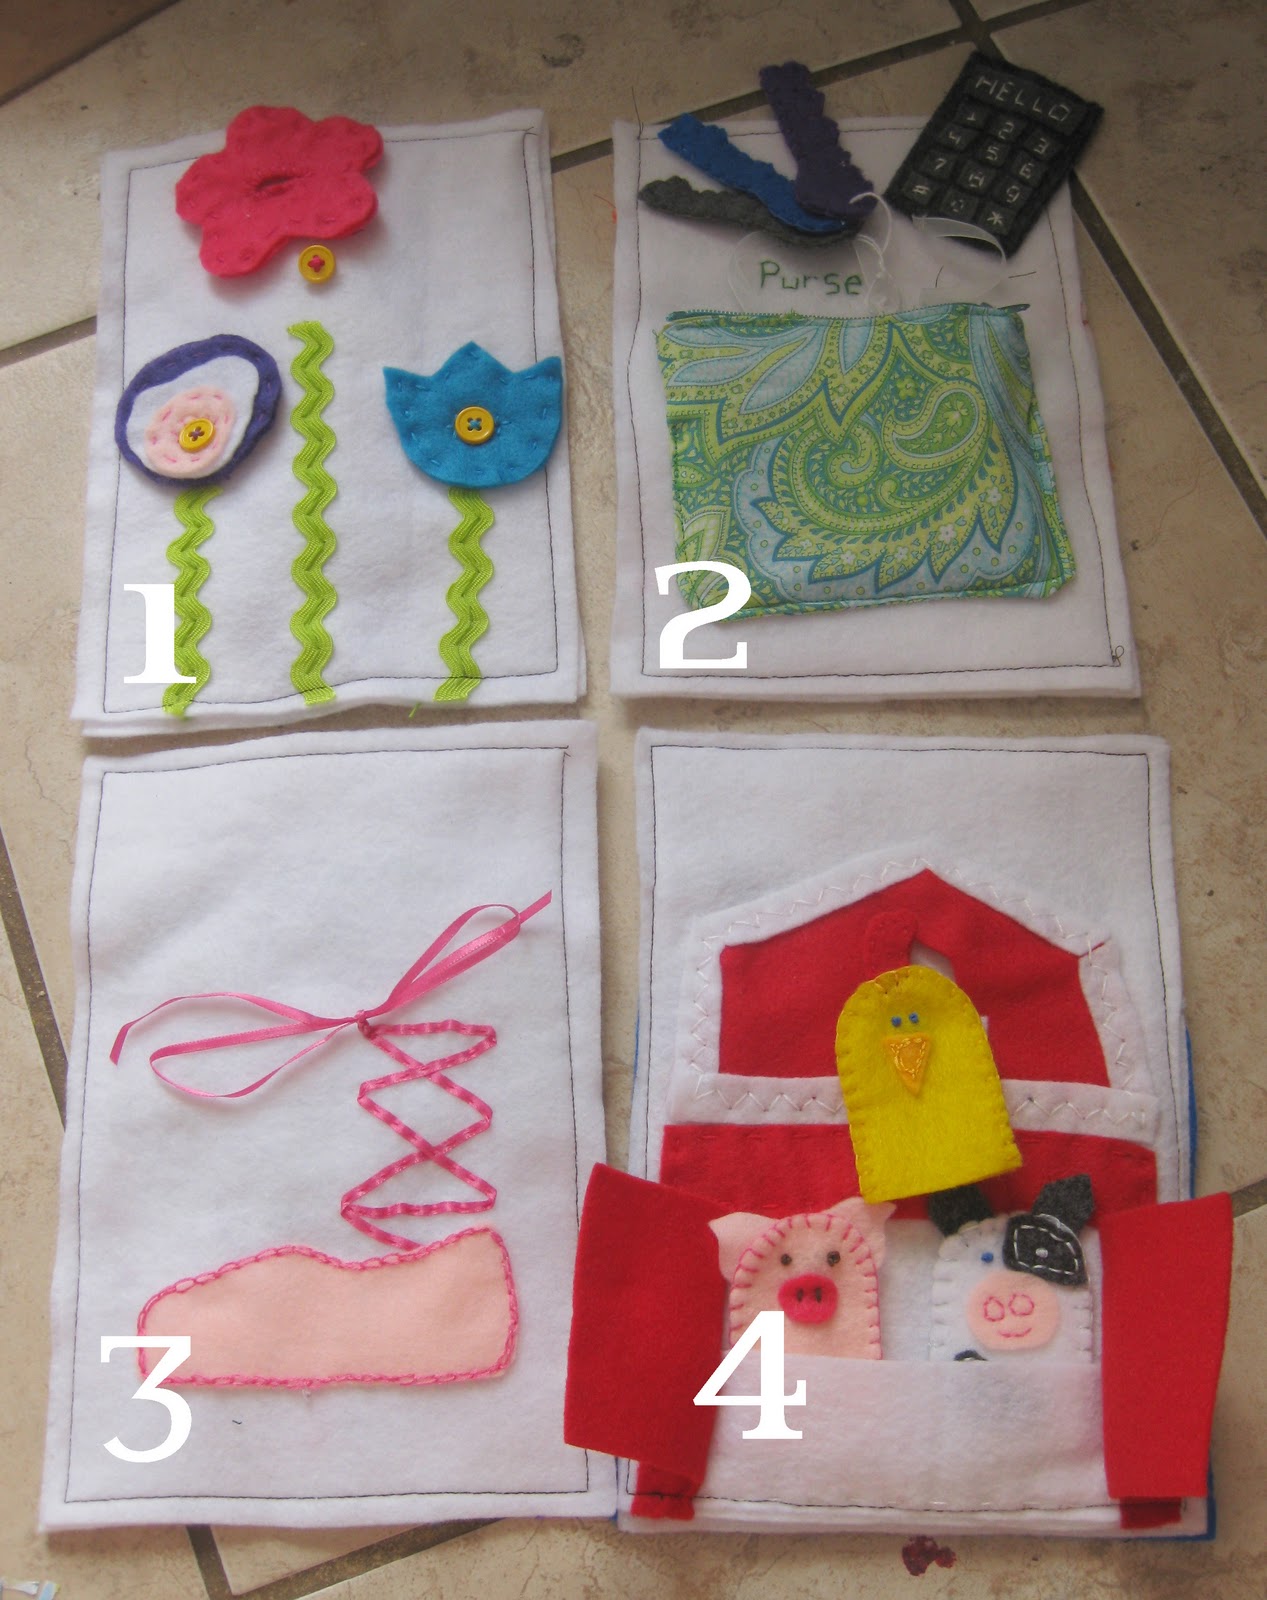
I've really been wanting to make some good quiet books for my baby girl for Christmas. I have searched high and low on blogs and internet for ideas. Here is the first book I made. Another one will be finished soon.
#1 Button on flowers
#2 A little zipper purse with a cell phone and keys inside. ( I used ribbon to attach them so they don't get lost)
#3 Tie the bow on the ballet slipper
#4 Open the farm doors and play with the finger puppets.
#5 Apples and an owl to velcro on the tree
#6 A little mini abacus with beads for counting
#7 Ice cream scoops. Count them as you stack them
#8 Going fishing! Each fish is attached with a hook and eye. (the example I saw didn't have each fish on a string, but I hope this minimizes the chance of lost fishies)
Most all of the pages are hand stitched. It makes it a little easier to add such small details on each page. I machine sewed on the velcro because in my experience it needs to be really strong to last.
My baby girl likes the touch and feel books. I know all of you are thinking, "Okay, Shelly, so just go and buy one." Well, I'm weird. I love home made stuff and why buy when you can make. It's more fun for me. I realized that I had a lot of good fabrics with different textures and I wanted to try out making a book out of mod podge, so here is what I came up with.
I started with some super cute paper.
It is double sided with cute patterns. I used the mod podge to put animals on the pages, then sewed fabric swatches for the texture over the top of the animals.
For the back sides of the pages, I mod podged shapes over the stitches so that they aren't as noticeable.
The fun thing is that the mod podge makes the paper flexible without tearing or getting creases. I let Aliza test out a couple of the pages and they held up quite well.
Here's the orange one after she crumpled it. You can just smooth it back to it's shape.
I bound them together (and forgot to take a picture before I wrapped it). Hopefully I'll take a picture for you and post it later.
I also made some fun bibs for her. The colors are a little funky because I used a lot of my left overs, but they will just get gooey anyways, right?
I especially like the apple and splat bibs. I thought they came out cute.
About a month ago, I made Daisy Dress Up for my little girl. It makes for a fun activity to do on long car rides or in waiting rooms. We had our first occasion to take our special toy out during a long church meeting. I soon noticed that despite the Tic-Tac-Toe game that the boys had, they were a little jealous. Each of my boys discreetly tried out Daisy, but since she was a girl they tried to act less interested. And so, we made Changing Chad. Now the boys will have equal opportunity to join in the fun.
I made him the same way as Daisy. I started with a handmade template of Chad and ironed on his undies with Wonder Under. Then I added some of the soft side of velcro to his chest and tummy to stick his clothes on with. Sew around the edges to secure him to his home on the yellow felt (also double thick with a pocket on back for easy storage). I made a second template once he was done to make the clothes from (in case he shifted during the sewing). His clothes are made from a double thickness of felt (and some pleather for his chaps and vest) with the scratchy side of velcro on the back. So far, he's a huge hit. The boys are glad they can play and it's no longer girly!
I made these for my baby girl to have something fun to play with. I made lots of different textures and things to grab. So far so good, she seems to like them.
They were easy to make too. Just 6 squares for each, some ribbons and fabric scraps. You can do whatever you want on each side. It was fun.
I picked up some fun items at Michaels. Each thing was about $1. Here is what I got:
For a table I got a package of two big cirlces and 3 spools. Though I am only using 1 circle and 2 spools. I can keep the extras for something else fun.
For some stools, I got a package of small circles (6 of them) and 2 packages of these knobby things with 7 in each.
I'm using 4 circles and 12 of the knobs for the stools.
I painted the legs blue and used mod podge to add the yellow paper to the tops. Then I glued them together like so (I used tacky glue since it's sticky enough for the legs of the stools to stand up on their own)
Here is the finished product
I also picked up one of these premade cabinets at Michaels (I think they are like $2) and painted it to match the kitchen furniture. It's going to be the food cabinet.
For the pet beds I got three of these.
I painted them blue then put a little bit of stuffing inside topped with a circle piece of fabric for the pillow. I used my hot glue to keep it in.
I didn't take a picture but I also used some mod podge on top to stick some little star and moon punches on top (seen below)
And here are her Littlest Petshop pals enjoying their new spaces. My daughter is so excited to have a place for her little animals to play.
When we took apart our terrible closet made of particle board, we had this piece left over.
I thought it would be fun to make something out of it. I soon decided to make it into a play doll house for Mikyla. I spray painted around the edges.
Then I used some mod podge to create wall paper.
We decided the top floor will be the bedroom. Next is the bathroom(blue), then the kitchen(green) and the living room will be on the bottom. Now I have a whole new world of creating to do as we come up with fun furniture and things to fill our house with.
To Do:
Find a idea for the roof
add windows with mod podge
create furniture for each room
Several weeks have gone by since I started. Mikyla and I have been a little at odds about who gets to use the house. Ultimately she wins, though, because she will be the one to play there, not me. I orginally wanted a Barbie house, but evidently this is no good since Barbie can't stand up in the rooms (they just aren't tall enough). So, it will be a house for her Littlest Petshop Animals. She plays with them more anyways. My little animal lover. I already have some ideas for furniture. Keep your eyes peeled for more on our "doll" house.