About me

Hi! I'm Shelly - mother of 5 and wife to the best man in the world. We love to play games and watch movies together. I have a passion for crafting in all it's forms - sewing, scrapbooking, bow making, painting, mod podge, you name it and I'll try it. Hope you enjoy our family adventures and crafts!

How I Became Shared Jelly

When my husband and I first got married we used to get messages on our answering machine for "Shared" and "Jelly" instead of Jared and Shelly. The first time we chuckled a little over it and by the fourth or fifth time, we decided the name should stick somewhere. And so, I've been sharing jelly all over the internet since. Enjoy!

Pages

Friday, December 30, 2011

New Years Countdown Bags


I've seen different versions of these for the past couple of years and have adopted this into our new traditions.
You can check out Hoosier Homemade to see the idea here.  There is a cute free printable here at The Idea Room.


Inside mine, I will be putting cards telling what we are going to do.
At 6pm, we'll do a dinner of appetizers and finger foods (our tradition) and fill out a "Time Capsule" sheet.
At 7pm we'll play a board game together.
At 8pm we'll play rock band.
At 9pm, we'll enjoy rootbeer floats together and make some decorations & noise makers.  I'm doing some rocket poppers (like on Martha Stewart's website) and paper plate tambourines.
Then at 10pm we'll watch the ball drop in New York on TV and turn on a movie to see how late they can all last.

It's going to be cheap and it's gonna be a fun one!


Balloons would also be fun!  Maybe next year.


And the thing I'm most excited for is that I get to go see Wicked tomorrow!  Finally!  I'm probably the last one to see this of everyone I know and I'm excited.

Enjoy your new years celebrations!

Tuesday, December 27, 2011

Tiered Skirts for My Baby Girl

Every day she grows a little more.  Mommy has to keep up. Plus, I have the extra fabric laying around taking up space anyways.

The skirts are pretty easy. I started with her waist measurement which was 18 and multiplied by 1.5.  That means my first tier needs to be 27 inches wide.   

Then do 27 x 1.5 for the next tier, which was 40 inches wide.
One more time for the last tier 40 x 1.5 = 60 inches wide.

Then to decide the length of each tier, you would measure the length from waist to knee.  My skirt needed to be 10 inches long.  I had 5 inches of the black on top and 2 inches of it went into folding over the waistband - another 1/2 inch gets taken for the seams.  Then 5 inches of each of the other two.   If you wanted each tier equal, you need to add extra to the top tier.  Anyways, I hope that makes sense.  If not, there is a detailed tutorial at Make It and Love It.
For this one, I just added a 3 inch ruffle to the bottom.  I took the width of the skirt and multiplied that same 1.5.  If you want it more ruffly, you can also multiply by 2.

Saturday, December 24, 2011

Plate For Santa

We got this red plate for our wedding and we rarely use it, so I added some vinyl lettering on it for a Christmas plate.  The outside edge has all the kids names on it, but I blurred them out of focus (for safety reasons?)

Thursday, December 22, 2011

Gingerbread Houses?

First of all, we make ours of graham crackers-we always have them on hand.  Second of all, houses are hard to build out of graham crackers and frosting - we've had several collapses.  Third, we have mostly little boys.  So this year, we got a little creative with our building. We did one house, a train, a car and a tank this year.


Monday, December 19, 2011

Giant Puzzle Poster

My son, Hunter, actually had this idea.  He is always thinking of something.  He asked if we could make a big picture that we each colored a part of and pieced them back together.  I found a coloring page online and blew it up onto four sheets of paper for the kids to color (using Adobe Illustrator).  Then, we pieced them back together. The kids love it.

Sunday, December 18, 2011

Kid Wreaths

I cut out a circle out of a paper plate and let the kids paint it green and decorate it with construction paper.  Here are how they turned out.


Ornaments

I picked up these clear plastic ornaments at Michaels and we decorated them as a family activity this year.  We put a little picture of each kid inside as well as a note telling a little message of their choosing.  Then we colored them with permanent marker and glitter puff paint.
It was fun to do together. I think it would be fun to make ornaments together every year as a tradition.

Tuesday, December 13, 2011

Gingerbread Men

I found a package of these for $1 at Target and couldn't resist.  Add buttons, markers and bits of ribbon and the kids have a blast.
( I just couldn't find any of the others to take pictures of) 

Friday, December 9, 2011

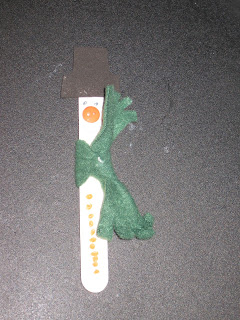
Snowman Sticks

I'm trying to do some fun Christmas projects with the kids, so I've been hunting for ideas.  Here is one I came across.

You'll need:
Popsicle sticks (the large ones)
Misc. Buttons
scrap of fabric (for the scarf)
black foam (or paper)
markers
whit paint


Put them all together and what do you get:

I like that each of the kids had their own spin on what they wanted their snowman to look like.  It was a fun little project.

Thursday, December 8, 2011

Holiday Card Collecting

No matter how outdated it is to send mail, I still look forward to getting Christmas cards for the holidays. I found this cute idea online for showing off the cute cards.  I started by gluing glitter on some wooden clothes pins.

Then I hung a string up on my wall to hang the cards from.

Now we can all enjoy them together as a family.  Only 3 cards, but it's still early.   I can't wait to fill up my string!

Christmas Dress Update

Amazingly, I was given two identical red Christmas dresses by two different people in sizes 8 and 2T.  This happens to be the exact sizes of my girls this year.  To not have to buy two dresses is a miracle in and of itself, but to find matching dresses in those two sizes is even harder.  The only problem is that they were a little too plain for my (and my daughter's) taste.  So I decided to give them a little updating.  Here is what it looked like before:
I removed the existing flowers, put a black ribbon around the center and replaced with some new pretty flowers like so:

Now I have 2 pretty matching dresses for the holidays.


New T Shirts for My Hubby

Ever since I got my Silhouette (last Christmas), my hubby has wanted me to make him some new T-shirts with it.  I finally got around to it.  So sad it took so long.  I got some of their heat transfer in black and white and created these two shirts:

 This US Soccer shirt cost us about $7 to make instead of the $20 it would have cost to buy one from their store.
Then he wanted one with our logo.  We are shared jelly after all (see top of my blog for the story)