
Friday, September 30, 2011
My Dad is So Awesome
My Dad has the greenest thumb of anyone I know. While they were down visiting the other week, he gave me this fabulous gift:
 He built me this wonderful box garden! My old garden ended at the tomato plants you see in the middle. Now it extend to the end of the old grassy area. I was excited to plant some new stuff for the fall/winter.
Thursday, September 29, 2011
Halloween Subway Art
My dad made me a new box garden and left me with some leftover boards from his project. When I saw this on Tatertots and Jello, I knew I wanted to make one with the board he left me.
 I had black and white vinyl, so I did mine orange instead. I used my fabulous Silhouette to cut it all out and put this baby together. I think mine will have it's resting place somewhere on my porch, but for now, it is propped against my wall waiting for a permanent home.
 It was my sweet daughter's idea to make it into a pumpkin (because it was orange) so I tied some green ric rac to the top.


Tuesday, September 27, 2011
Autumn Front Porch
My in-laws gave me this old bench they had. I was excited to give it a home on my porch for my autumn decorations. I see paint in it's future, but I'm not sure which color? Hmm....... I'm excited for the holidays and decorations again, though. The next three months will be decoration filled for sure!
 It's the new home for my cloth pumpkins I made last year.Yay!

Happy Birthday! The Big 5!

Monday, September 26, 2011
Felt Flowers
Just wanted to show you some ways to make cute felt flowers I used in my fall wreath. All you need are some long strips of felt. My smaller flowers were made from 13 inch strips, the larger ones were about 30 - 40 inches (left over from some felt yardage I had from my Thanksgiving Countdown Calender).
#1 Rolled Flowers
For this flower, you simply roll strips about 1/2 inch thick. You can do it with straight or wavy strips.

 You simply start with one end and roll up the strips. Here is what the straight one will look like when it is rolled up:
 Here is the wavy strip once it is rolled up. Just a little more texture.
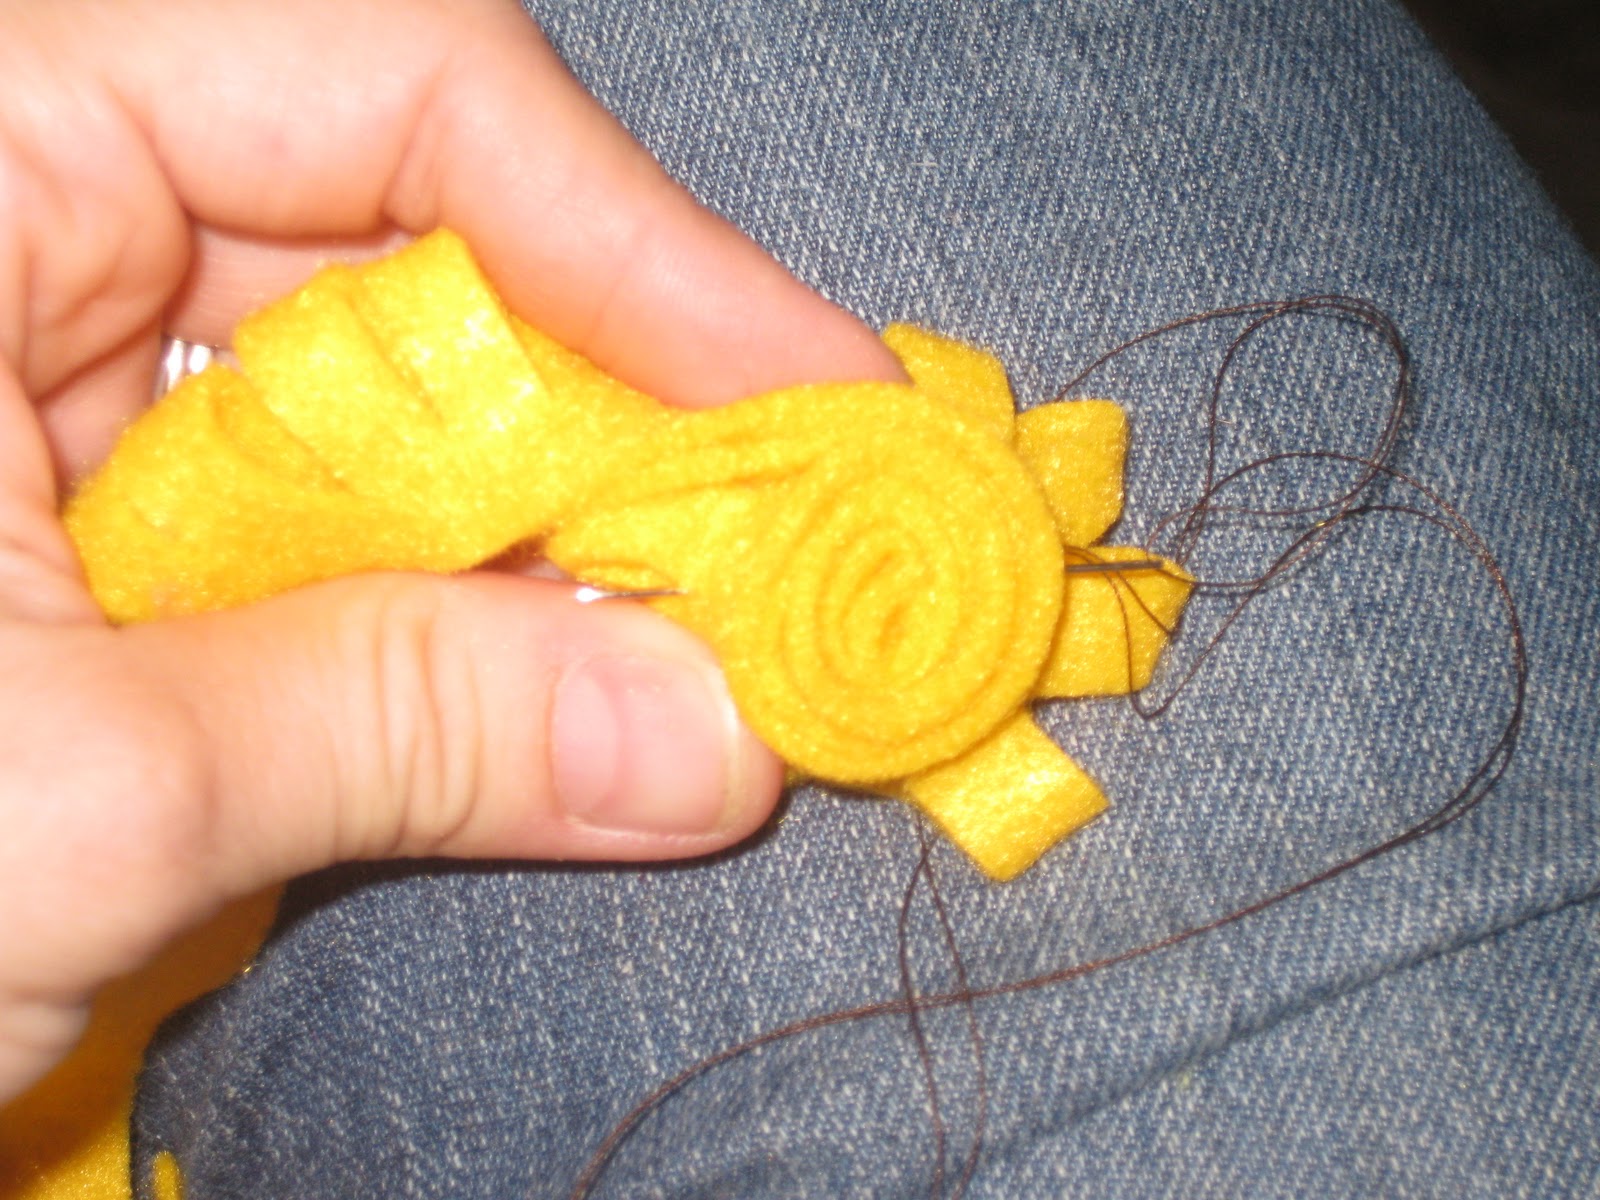
 I used a needle and thread to put some stitches trough the roll to secure it in place.
#2 Rolled Petal Flowers
Start with a strip cut about 1 1/2 to 2 inches wide.
 First you are going to fold it in half lengthwise and cut notches in. Make sure you don't cut all the way through. It should look like this
 Once you have cut notches in the entire length, you roll it like you rolled the others.
 This time the notches you made will form petals. Stitch it as you go from the back to keep it secure.

When you are finished rolling, it should look like this
 And from the back, you can see all my stitches in brown.

#3 Rolled Flower From Scraps
For this type of flower, I took my crazy leftover scraps from other projects. You can see that I had cut out circles from this red felt in the past.
 I rolled up these scraps along their edges like this
When I was done, the back wasn't flat. It was all messy like this
 So I just cut it straight and then stitched my flower together
 #4 Circle or Scalloped Edge Flowers.
For the last kind of flower you can either cut out circle in varying shapes and stack them or look online for a free flower template and use it to cut out flowers. I'm sorry I didn't save the link from the one I found. Anyways, you cut them out, stack them and put a secure X stitch in the middle.

All in all the flowers are pretty easy to make and take very little sewing skill. You could easily make these and stick them to just about any project you wanted with a little hot glue.
#1 Rolled Flowers
For this flower, you simply roll strips about 1/2 inch thick. You can do it with straight or wavy strips.


#2 Rolled Petal Flowers
Start with a strip cut about 1 1/2 to 2 inches wide.


When you are finished rolling, it should look like this


#3 Rolled Flower From Scraps
For this type of flower, I took my crazy leftover scraps from other projects. You can see that I had cut out circles from this red felt in the past.

When I was done, the back wasn't flat. It was all messy like this


For the last kind of flower you can either cut out circle in varying shapes and stack them or look online for a free flower template and use it to cut out flowers. I'm sorry I didn't save the link from the one I found. Anyways, you cut them out, stack them and put a secure X stitch in the middle.

All in all the flowers are pretty easy to make and take very little sewing skill. You could easily make these and stick them to just about any project you wanted with a little hot glue.
Saturday, September 24, 2011
Autumn Wreath
I wanted to make a new wreath for Autumn. My inspiration came from these two ideas.

 I had some brown burlap and a large embroidery hoop that I rarely use. I also really liked the felt flowers from Nest of Posies. So I melded the two ideas and came up with this.


I didn't glue the burlap into the hoop or anything, so I can easily take it out and use the hoop after I'm done with it.
I cut the word Autumn out on freezer paper using my Silhouette. And I painted on my own stencil. For more info on how to do freezer paper stencils visit this link for a tutorial. There are dozens of tutorials for freezer paper stencils if you need help.
Soon I will post up my tutorial of how to make all these fun felt flowers.
Thursday, September 22, 2011
Picture Day


Friday, September 16, 2011

Tuesday, September 13, 2011
Bench Covers
My husband and I were so excited when we purchased our first NEW furniture item two years ago when we bought our house. We have been married for 10 years but have always bought things from thrift stores or gotten hand-me-downs from other people. Well, we always have wanted a square dining table with bench seating and they are really hard to come so when we found it at a random furniture store in Orange, we knew it was meant to be ours.
2 short years later, it has been roughly loved by our 5 children.
 Our two littlest boys learned how to "draw" in the table with their forks (big time trouble for that one) and the leather benches just aren't meant to be jumped on by little legs. After many months of this:
 Trying to hold the seams together with duct tape and keep the kids from peeling the leather off with their little busy fingers, I finally made some black fabric covers to hide the wear and tear.
 It's removable, washable and fits well -except for the corner piece that was very hard to figure out due to it's weird shape. I waited until the home decor fabrics went on 60% off at Joann's so it wouldn't hurt the wallet quite as bad. I'd say this was a much better solution than buying a new dining set. I think I will eventually do something in a print on the two remaining leather chairs, but for now I thought I'd share my project with you.
2 short years later, it has been roughly loved by our 5 children.


Thursday, September 1, 2011
Stroller Bag
I don't like to have to carry a bag over my shoulder while I'm pushing a stroller around. It just feels awkward. I also don't love trying to wrap my purse straps around the stroller so that it won't drag on the floor if I decide to put it on the stroller.
Solution! I saw this idea somewhere in the bloggosphere and I came up with my own version to fit my umbrella stroller. Now I can put my stuff in this purse when I'm strolling around and I can grab it and put it over my shoulder when I leave the stroller.It velcros right onto the handles and stays up out of the way of the wheels.

 I also included a pocket and an elastic strap for putting a bottle or sippy cup inside.
 I tried it out at the zoo the other day and it worked great. Yay for easy transition! Next I want to design one for my sit and stand stroller.
Solution! I saw this idea somewhere in the bloggosphere and I came up with my own version to fit my umbrella stroller. Now I can put my stuff in this purse when I'm strolling around and I can grab it and put it over my shoulder when I leave the stroller.It velcros right onto the handles and stays up out of the way of the wheels.


Subscribe to:
Posts (Atom)